Friday, August 30, 2013

Wow that’s big workbook. Unfortunately we can’t open a workbook larger than 10MB. You’ll need to open this in Excel - Large workbook error in SharePoint Excel Services

While working with excel workbooks in SharePoint, I got an error saying that, “Wow that’s big workbook. Unfortunately we can’t open a workbook larger than 10MB. You’ll need to open this in Excel.”


After checking issues into deep, found that the reason for this error is the size of the workbook to be opened is larger than the maximum size of workbook. We can configure the maximum size in the excel services settings.

To change the value, Navigate to Application Management, select Manage Service Applications link.


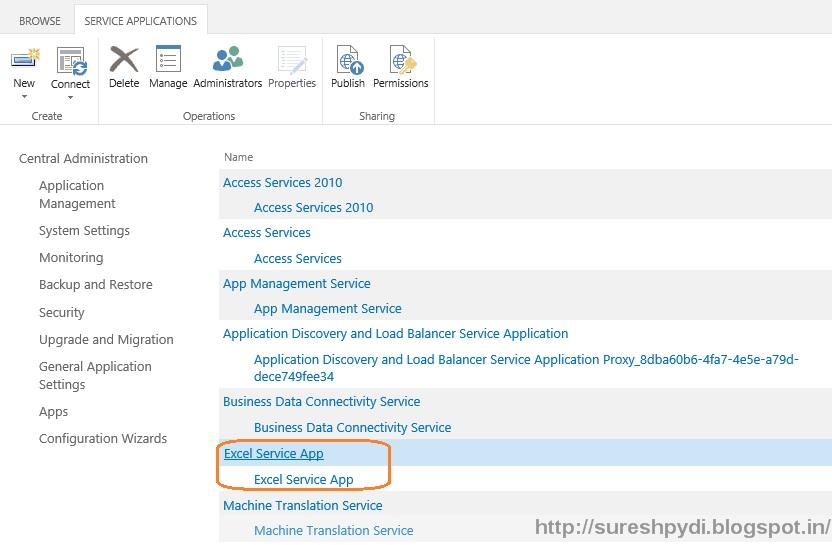
Select Excel Service application to configure to configure maximum value.


Click on Trusted File Locations in Manage excel service applications page


We’ll be navigated to Excel Services Application Trusted File Locations. Click on specific address we need to configure maximum size.


In Excel Services Application Edit Trusted File Location page, Workbook properties section, we have to specify the Maximum Workbook Size as per our need, click on OK 
button. 


Wednesday, August 28, 2013

Configure digest authentication in SharePoint 2013 web application

We can configure digest authentication in SharePoint web application zones. Zones are the logical paths for access to a web application. We can create five different zones for each web application in SharePoint. We can use IIS Manager Console to configure digest authentication one or more zones in SharePoint web application.

Digest authentication encrypts user credentials to increase the security. We can send user credentials in MD5 message digest. Digest authentication will use challenge/response protocol for authentication process. To authenticate the use client needs to send MD5 message digest in a response contains secret password string.

To configure digest authentication,
Go to IIS Manager (Run -> Inetmgr) and Expand Sites node and select the web application to configure digest authentication In features view double click on the authentication located in IIS section


Right click on the digest authentication and select enable option to enable digest authentication in Authentication section.


Right click on digest authentication and select edit option to provide Realm value. We have to provide Realm value as IPAddress of the DNS domain that uses the credentials for authentication against internal domain.


Monday, August 26, 2013

Configure document synchronization for all document libraries in SharePoint 2013

In SharePoint 2013, users can synchronize all the files saved in document library to the local machine and local machines to SharePoint document libraries. Windows sync in SkyDrive will performs the synchronization between SharePoint document libraries and local machine. Users can take the documents or files and work on them and will sync with SharePoint after reconnecting to SharePoint. We can allow restrict the file synchronization.

We can manage the Synchronization settings for SharePoint site collection by navigating to Site settings and click on the Search and Offline availability in Search section. By Selecting Yes/No option for Offline Client Availability we can specify the site to available for offline clients.


We can add and remove synchronizations using following PowerShell scripts,
To add Synchronization we need to make Offline Client Availability setting to Yes for all the sites in SharePoint using the command below,

Get-SPSite -limit all | get-SPWeb -limit all | Foreach { $_.Title = $_.Title; $_.ExcludeFromOfflineClient=1; $_.Update() }

To remove Synchronization we need to make Offline Client Availability setting to No for all the sites in SharePoint using the command below,

Get-SPSite -limit all | get-SPWeb -limit all | Foreach { $_.Title = $_.Title; $_.ExcludeFromOfflineClient=0; $_.Update() }


Thursday, August 22, 2013

Assign Catalog item page and category page to a term in SharePoint 2013

To show structured content in a site, we can use category pages and catalog page layouts. This can be viewed to show catalog content on a site using managed navigation. We can assign a category page or catalog page to all terms or specific terms in a term set. We have to configure category page or catalog page.

To assign a category page and a catalog item page to a term,
Navigate to Site Settings and click in Term store management in Site Administration section.

Click on the term to assign a category page and catalog item page in Term Store Management tool page Taxonomy Term Store section.


To assign category page, click on TERM DRIVEN PAGES tab select Change target page for this term check box in the Target Page Settings section and need to enter URL of the category page that to assign to the term. To assign category page for child terms, we have to select Change target page for the children of this term check box and enter URL of the category page to assign to the term.


To assign catalog item page for catalog items we have to select Change Catalog Item Page for this Category and need to enter the URL in catalog item page. To Assign catalog item page for catalog items tagged with the child terms of current term, select Change Catalog Item Page and need to enter URL of the catalog item page. 

Wednesday, August 21, 2013

Cross Site Publishing in SharePoint 2013- Part III - Connect publishing site catalog in SharePoint

To display the content from a list or library that is shared as catalog, we have to connect the publishing site collection to the catalog. To connect the publishing site collection catalog, catalog content and term set should be integrated to the publishing site collection and friendly URL need to create for the item details page.

We can connect the publishing site to a catalog by the steps below,

Navigate to publishing site setting page and click on Manage catalog connections link in Site Administration section.


Click on Connect to a catalog in Manage catalog connections page.


Click on connect button to connect the catalog. We can search specific catalog by searching in catalog name search field.


In Catalog Source Settings page Connection Integration section, to make the content available to the publishing site and to integrate catalog tagging term set to publishing site navigation we have to select Integrate the catalog into my site option. To make catalog content only available for publishing site, we have to select Connect, but do not integrate the catalog option. By selecting this option, we can use content from library to create individual catalog items.


We can specify the terms for catalog tagging to integrate the publishing site navigation terms in Navigation Hierarchy section. To integrate the catalog tagging term set from a different term, Click on Browse for a valid choice, Next to the Root term of hierarchy box. We can see Select: Add Terms dialog box that corresponding to the catalog tagging term set and click on OK. Select Include root term in site navigation check box to integrate the root term to the parent of selected term.

By specifying the terms in publishing site term set in Navigation position section we can set where the catalog tagging term set should be integrated.
In Navigation pinning section, by selecting Pin terms to site navigation check box we can made the changes in catalog tagging term set to be updated.


In Catalog Item URL Behavior section, By selecting Make URLs relative to this site option, we have to specify the catalog item URL to display the item details page in search index section.


In Catalog Item URL Format section, to use the field that specified primary key for shared library or list as catalog select Use the default URL format provided by the catalog source option. By selecting manually define a URL format option we can define the format for the URL manually. To construct custom URL based on the catalog properties we have to select Construct a URL format from catalog properties option and click Add button by selecting max five fields in Available Fields list.


In Category Page section, click on Create a new page to SharePoint 2013 server automatically create new category page for catalog content and select master page. Page will be automatically added to Pages library. By selecting Use an existing page, we can use already created category page.


To create new item in catalog content click on Create a new page and select master page. To use existing page select Use an existing page and specify the location. Click on OK.


Monday, August 19, 2013

Configure Search in cross site publishing

Cross site publishing depends on the search to create a content source and to manage crawling for SharePoint cross-site publishing. In SharePoint, content source will specify crawling in SharePoint farm. By default, after creating the search service application content source will be created in SharePoint farm.

We can re index content source that contains the catalog for changes to be added to the search index. We can re index the catalog content by using the steps below,

Navigate the library/list and go to settings page. Click on Advanced settings in General settings section.

Click on Reindex List link in Advanced Settings Page Reindex List section. And click on Reindex List to confirm to the catalog to be reindexed during the next crawl, click on Ok.


Wednesday, August 14, 2013

Make term set available to site collections in SharePoint

Once we create the term set in SharePoint managed metadata, we can make that available to all the site collection in the web applications or specific site collections. We can do that by the steps shown below,
Navigate to site settings and click on Term store Management in Site Administration section.

Right click on the term set that we want to make available to all the site collections, and click on Move Term Set.


In the Term Set Move dialog box, click on the global term set that to move and click on Ok button.


To make available for only specific site collections, In the Site Collection Access section we have to enter the URL of the site collection we want to make the term set available. 

Tuesday, August 13, 2013

Cross site publishing in SharePoint 2013 - Part II

In my previous post I have mentioned how to create Publishing site collection and authoring site collection and activate cross-site publishing feature. After configuring cross-site publishing, we need to set up new term set and terms and have to make that available for tagging the content. If we use Product Catalog template to create authoring site collection and create the term set in the site collection, we don’t have to tag the content because by default new term sets created for product catalog site collection will be available for tagging the content.

We can make the term set available for tagging content as shown below,
Navigate to Authoring site, Site Settings page and Click on Term store management link in Site Administration section.


In TAXONAMY TERM STORE section, click on the term set that we want to make available for tagging. Click on INTENDED USE tab and select Available for Tagging and click on Save.


To create the catalog content using lists, we have to create site columns for the lists to maintain the catalog content. Because we can create managed properties automatically and use them when defining the queries for catalog content on the publishing site. If we have many lists, we can use site content types for each list.
We have to share the list/library as a catalog when we are done with creating site columns. We have to activate Cross-Site publishing feature to share list/library as catalog. By default, Anonymous access will be enabled when we share a list/library a catalog. If we don’t want anonymous users to view and search the content we need to disable the anonymous access.

To share library or list as a catalog,
Navigate to list/library and click on List/Library tab on the ribbon. Click on Library settings in the Settings group.


Click on Catalog Settings link in Settings page General Settings section.


Select Enable this library as a catalog check box in Catalog Settings page Catalog Sharing section.


If we don’t want anonymous users to view and search the content click on Disable anonymous access in Anonymous section. Select five fields for unique identity in list or library and click on add in Catalog Item URL Fields section Available field’s box. These will be appearing as friendly URL’s after connecting the publishing site to catalog. Select associated columns with term set in Navigation Hierarchy section to use navigation term set for catalog pages. and Click on OK.

Friday, August 9, 2013

Information management policies in SharePoint

Information management policy is a set of rules for content. Each rule in a policy is called as policy features. Information policy management features specify the content auditing, content accessing and how long that information retained.
We can associate a policy with a library, list or content type.
Associate policy features with site collection policy and associate with content type or list/library: Top level site collection will have site collection policies to create site collection policies. After creating site collection policies, we can export to other site collections to standardize policies across the organization.

Associate policy features directly to a content type and add that content type to lists:
We’ll use whole site collection associated with a content type in the site content type gallery of the top level site. Every item in that content type and every item inherit the original content type will have a policy.

Associate policy features directly with a list or library: This method will applicable for only for the list does not support multiple content types. This will be useful for applying for single list/library.

We can configure Information Rights Management using the steps below,
Navigate to Security in SharePoint central Administration, Click on Configure information rights management link in Information Policy section in Security page.


On Information Rights Management section we have following options,
If we don’t want to use IRM select Do not use IRM on this server option
Select Use the default RMS server specified in Active Directory option to specify the RMS server in the Active Directory Domain Service (AD DS)
Select Use this RMS server option to enter url to specify the URL with protocol. Click on Ok.


Wednesday, August 7, 2013

Configure Document conversion and Create web page from document in SharePoint 2013

By using Document conversion, we can create a web page with uploaded document in simple and easy way. By using this functionality content authors can create pages with content easily because the converter is associated with content types and content author is not limited any document library.

To Configure Document conversation we have to enable Documents Conversations Load Balance Service and Document Conversations Launcher Service in the Central administration.


After starting the services, navigate to General Application Settings and select Configure document conversations in External Service Connections.


Select Web application to configure document conversion Web Application section. Select yes in Enable Document conversion section to allow files to be converted from code type to another on the site. Select Load Balance Server in Load Balance Server section. Enter schedule timings to specify how often document conversion timer to be run.


Once we are done with the configuration, upload the document to a document library and select Convert document -> From word document to Web Page as shown below.


We will redirect in to Create Page From Document Page, Select location of site where we need to save the page in Location Section, Enter Page Title and URL in Page Title and Description section. In Processing section, select create this page for me now, and take me to the page when it is create to redirect to the new page after creating. If want to redirect document library after creating the page, select Create this page for me in the background, and take me back to the document library. Select Send e-mail to the following users when the page is created check box to send emails to the users in Users Text box.


Tuesday, August 6, 2013

Cross site publishing in SharePoint 2013 - Part I

Cross-site publishing will allow us to create and maintain the content in one or more authoring Site Collections. It will allow us to publish and access the content one or more site collections. We can use cross site publishing when we want to save and manage the content in one more authoring sites. We can use cross site publishing across the site collections, web applications and farms. It will allow us to mix the pages and catalog content.

Cross site publishing will use search to retrieve the content. When we create Content in a list/library of a site collection where cross-site publishing is enabled and we need to enable the list/libraries as catalogs. When we crawl the content, content will added to search index. We can add the web parts in other site collections where we wanted to display the content. When users view the page, search webparts crawls the data by passing the queries to search index. Query results will return from search index and shown in the Search Web Parts. When we change any content in the source site collection, all the data will be updated in destination site collection after crawling the data.

We can proceed with cross site publishing by creating authoring site collection and publishing site collection. Structure for cross site publishing will looks like following.


To create authoring site collection, create new site collection by navigating Application Management, Create site collection in Central Administration and select Product catalog in Publishing tab.


To create publishing portal, create new site collection by navigating Application Management, Create site collection in Central Administration and select Publishing portal in publishing tab.


After creating the site collections, we need to activate Cross-site Publishing feature in authoring site collection. We can activate the cross site publishing feature By Navigating t Site Collection features in the site settings, Click on Activate button for Cross-site Collection Publishing feature.


We need to add the content in the authorized site collection list and crawl the content. We can look in to the next articles.