
Friday, April 12, 2013

SharePoint 2013 - Configure managed metadata service

In my previous post i have published the basics of managed meta data. In this post iam writing about how to configure managed metadata service.

What is managed meta data service?
Managed metadata service, is allows to use managed metadata and share content types on Site collections and Web application level. Managed meta data service application publishes term store, content types in site collection/Web application level and a managed metadata connection in share point. 

By enabling managed meta data service application, managed meta data service will be automatically created.Service will identifies the database to be served as term store and connection provides access to the service. All enterprise managed terms will be stored in the DB that specified by managed metadata service. When ever administrator creating connection to the service and  publishing the managed metadata service, he need to know the URL of the service. We can also use managed meta data service to share content types.

To use managed meta data, a web application need to have connection to the managed metadata service. When managed meta data service is created, a connection will be created to the web application.

How to configure managed meta data service?
We can configure the managed meta data service in central administration. 

Central Administration--> Application management-->Manage service applications 
Configure meta data service app


In Manage service applications, add new managed meta data service as shown in the image below.


Add Name, Database name, Application pool name details in the popup as shown images below.
Name: Name of the service.
Database name: Name of the data base for the service.
Application Pool: Application pool to run the service.


Managed meta data service will be created in the service applications. 

Check managed metadata web service is running in the services (Application management--> manage services)


After creating managed meta data service, we need to check the following properties (Managed meta data service--> Properties(top ribbon))


Default Keyword location: To store new enterprise keywords in the keyword set associated term store in the managed meta data or not.

Default term set location: To store term sets, while creating managed meta data site columns in managed meta data term store.

Use Content Types: This option will available only if the service has hub defined to share content types. This option need to select when to make content types that associated managed meta data service available to users of sites in the web application.

Push-down Content Type Publishing updates from the Content Type Gallery to sub-sites and lists using the content type: This option need to select when update the existing instances of the changed content types in sub-sites and libraries.

Check the permissions for managed meta data service (Select the service--> click on Administrators (top ribbon)), assign administrator to the service as shown the images below.

By clicking on the managed meta data service, it will redirect to managed meta data screen as shown in the image below. There we can create new groups, term sets and terms.


Hope this will help for how to configure managed meta data service, Provide your comments and suggestions on this post.


Wednesday, April 10, 2013

Share Point 2013 - managed meta data - Basics

All of you heard about metadata, that is data about the data. While learning share point by hearing the word meta data, thought it was a complex topic and need to check a lot (books or blogs) to understand the concept. But after going through some blogs realized that it is not that much complex topic. for simple understanding about metadata, take a company- company will have Name, Owner, Services (type of services provided by the company), Company site url..etc. All these attributes are called as metadata for company. 

In SharePoint context, Document library- document will have Title, Author, Created date, Edited date..etc. All these attributes are displayed as columns in document library. 

Why metadata?
If we don't have metadata, there is no way to describe and search for a document. For example we want to search a document "contracts", we can access the document by searching by name "contracts". We can use metadata to make search easier. For security and retention also we need metadata. If meta data managed correctly every thing will be fine, without proper organization of metadata things will not work as expected in share point.

meta data allows keywords to describe content, allows tagging to blog posts, folder. That makes search easier . For a document, by default all the metadata will not be shown. Administrator has permissions to change the view of document. By changing the view users can see the meta data associated with the items. Addition to the default metadata, we have options to add custom meta data by adding custom columns. These custom columns will give more information for the user.

In death- managed meta data:-
Term is a word or a phrase associated with an item.
Term store is a database that hosts the taxonomies(terms)
Term set- second level of a taxonomy or logical grouping of related items.
Managed meta data- terms and term sets created and managed independently from the columns can be treated as managed metadata.

Local Term sets are created with in the site collection.collection. For example if we added a column to a document library, created a term set and assigned term set to the column. The new term set is local to the site collection which contains the document library.

Global term sets are created out side of the site collection  Term store administrator will create new term set group as "School" and assign an user to that group as manager. Group manager would create term sets and relates to the School, Such as Students details and subjects in school term set group.

Generally, SharePoint users can only see the global term sets and term sets local to the current user's site collection.

Managed terms, are defined by the users who have appropriate permissions and organised as hierarchy.

Enterprise keywords, are words or phrases that were added to the share point items.

Both Managed terms and enterprise keywords will be saved in a data base called term store.

These are the basic concepts in share point managed meta data. I'll post more on how to configure managed meta data in share point 2013 and creating terms and term sets in share point 2013. 

Please provide your comments and suggestion on this post.

Friday, April 5, 2013

SharePoint 2013- Creating App Event handlers

In my last post i have explained how to create remote event receiver. In this post i am talking about how to create app event receivers in share point 2013.

As shown in my last post i have created remote event handler. After adding a remote event receiver to my app, anew web app project got create, Web app project contains web service code files related to remote handlers.

To enable to app events for your app, select the app project, check the properties for app project as shown below images. you can see three handlers in the properties related to apps, Handle App Installed, Handle App Uninstalling, Handle App Upgraded. Make the property to True that you need to fire.


Here Iam selecting Handle App Installed event. After changing the value from False to true you can see the new Service file "AppEventReceiver.svc" in Appweb project as shown below image.


In AppManifest.xml file <Properties> tag, new property  <InstalledEventEndpoint> will be updated with the AppeventReceiver service file as shown the below image.


Write the code as per your requirement. Here iam just creating a text file and writing the text in the file when app got installed in my share point site. Code will be


      public SPRemoteEventResult ProcessEvent(RemoteEventProperties properties)
      {
            LogAppEvent(properties);
            return new SPRemoteEventResult();
      }   
    
      private void LogAppEvent(RemoteEventProperties properties)
      {
            try
            {
                FileStream fileStream = new FileStream("D:\\AppFile.txt", FileMode.OpenOrCreate,FileAccess.Write);
                StreamWriter writer = new StreamWriter(fileStream);
                if (properties.EventType == RemoteEventType.AppInstalled)
                {                    
                    writer.Write("App Installed");
                    writer.Close();
                }
            }
            catch (Exception ex)
            {   
            }
      }

Here AppEventReceiver class will inherit from IRemoteEventService as shown in the image below. By default there will be two methods ProcessEvent() and ProcessOneWayEvent() as same as Remote event handler. Code file will be 


write the code in ProcessEvent() method. Here code will fire for AppInstalled event. In case if you write the code for AppUnninstalling event, and in the properties value 'false', event will not be fired. If you need to disable the event, just make the property value from True to False.

Provide your comments and suggestion on this post.

Thursday, April 4, 2013

Create Remote Event Receivers in Share Point 2013

Remote event handlers new feature added in share point 2013. I have already published a post regarding event handling in share point 2013. In this post Iam showing how to create a remote event receiver through Visual studio.

here iam considering a requirement that update title of Announcement list, when ever new item added to the Announcement list. So that creating an app that contains Announcement list and adding remote event handler to the app. The process shown as below,

Create New Project-->Select SharePoint App in Visual Studio 2013.


App should be SharePoint-hosted


Check the AppManifest.xml file and tag <AppPrincipal> should be <Internal/> as shown the code.

<AppPrincipal>
  <Internal/>
</AppPrincipal>

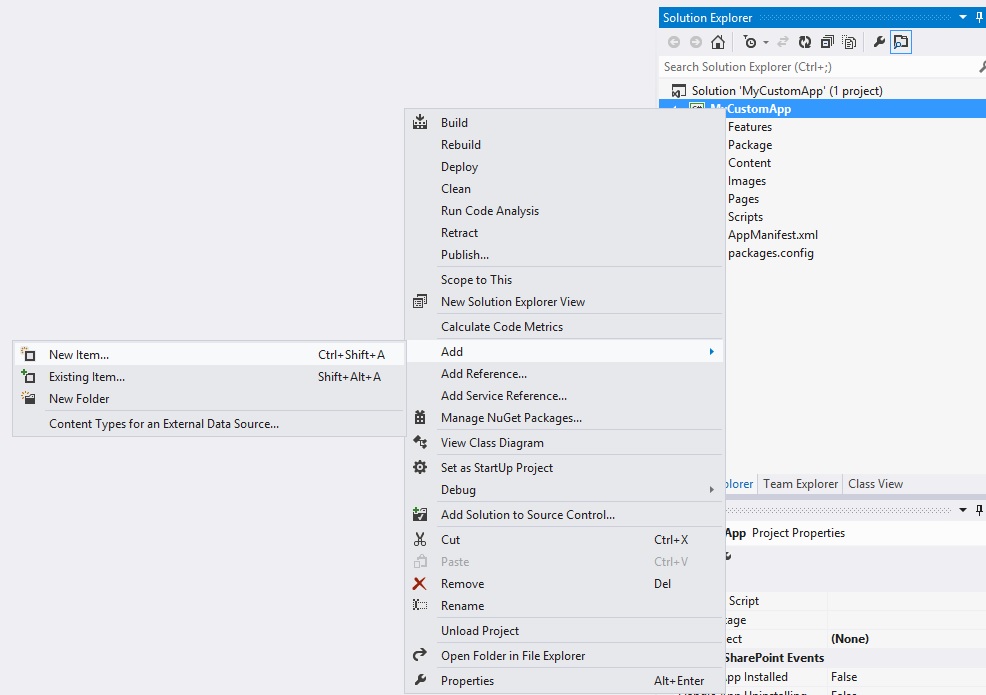
Add New item as list type of announcements , select list Item Type Events , select ItemAdded event as shown below 


Add new item as Remote Event Receiver to the solution.


After adding the remote event receiver, you'll get AppWeb project as shown in the image below. While creating Remote event receiver was selected list Item events and ItemAdded event. 


Visual studio by default add the Appweb to the project, App web contains the service file that to run the web service. A Remote event receiver web service by default inherits from IRemoteEventService. 

Remote event structure is different than regular event receivers. In regular event receivers we'll over ride the existing methods  Here in the Remote event handlers we'll write the code in two methods, ProceeEvent() and ProcessOneWayEvent(). So the both the methods will handle the Synchronous and Asynchronous events rather than writing every method. Here we can simply called the method by checking SPRemoteEventProperties.EventType enumerator.

ProcessEvent() will return SPRemoteEventResult, shows the status and error message like other server side events. In this method for item event contains dictionaries for before and after properties, list, user information.

Here i took Item Added event. So that i need to add the code in ProcessOneWayEvent. I was added the following code in the method. After item added to the Announcement list title will be updated through my coding. 
Here is the code in ProcessOneWayEvent() method.


public void ProcessOneWayEvent(RemoteEventProperties properties)
        {
            Uri myurl = new Uri(properties.ItemEventProperties.WebUrl);
            if (properties.EventType == RemoteEventType.ItemAdded)
            {
                using (ClientContext clientContext = new ClientContext(myurl))
                {
                    if (clientContext != null)
                    {
                        List lstContacts =
                           clientContext.Web.Lists.GetByTitle(properties.ItemEventProperties.ListTitle);
                        clientContext.Load(lstContacts);
                        clientContext.ExecuteQuery();


                        int cnt = lstContacts.ItemCount;


                        ListItem itemContact = lstContacts.GetItemById(cnt);


                        clientContext.Load(itemContact);

                        clientContext.ExecuteQuery();

                        itemContact["Title"] = itemContact["Title"] + "  changed by Remote Event Receiver";

                        itemContact.Update();

                        clientContext.Load(itemContact);

                        clientContext.ExecuteQuery();
                    }
                }
            }
        }


xml in Elements.xml will be


<?xml version="1.0" encoding="utf-8"?>
<Elements xmlns="http://schemas.microsoft.com/sharepoint/">
  <Receivers ListTemplateId="10000">
      <Receiver>
        <Name>MyRemoteEventReceiverItemAdded</Name>
        <Type>ItemAdded</Type>
        <SequenceNumber>10000</SequenceNumber>
        <Url>~remoteAppUrl/MyRemoteEventReceiver.svc</Url>
      </Receiver>
  </Receivers>
</Elements>

Here Url is the WCF service url to run the event receiver.

Add the following code to default.aspx page, in "PlaceHolderMain" contentplaceholder to view the list in the app home page.


<div>
       <WebPartPages:WebPartZone runat="server" FrameType="TitleBarOnly" 
ID="full" Title="loc:full" >
<WebPartPages:XsltListViewWebPart ID="XsltListViewWebPart1" 
runat="server" ListUrl="Lists/Announcements" IsIncluded="True" 
NoDefaultStyle="TRUE" Title="Announcements" PageType="PAGE_NORMALVIEW" 
Default="False" ViewContentTypeId="0x"> 
</WebPartPages:XsltListViewWebPart>
</WebPartPages:WebPartZone>
    </div>

Finally my default.aspx page will be,


Deploy the app and and you'll be redirected to sharepoint app page that containes Announcement list.

Add new item to the announcement list. Title will be updated with "  changed by Remote Event Receiver", in my next post i'll write about app event handlers.

Provide comments below if you have any issues creating the event receiver.

Tuesday, April 2, 2013

Sharepoint 2013- Handling Event receivers

In SharePoint 2013, to handle events in share point app need to create Remote event receivers or App Event receivers. Yes, In SharePoint 2013 event receivers are modified little bit and two new concepts are introduced.

Remote Event Receivers:

Remote event receivers handles events in an item in the app such as list item, library item or web. In remote event receivers, app responds, when ever item added, updated or deleted in a list/library. When ever creating new remote event receiver you can select the type of event receiver. for Eg. you select ListItemEvent, that fires whenever user add/updates/deletes the list item.
  • Remote event handler, a web application should be exists.
  • Web service will be added to the web application  That web service contains the code to handles the event.

Code file contains two methods ProcessEvent() and ProcessOneWayEvent().


ProcessEvent() handles before action happened  means before item added/updated.deleted. This is 2 way Synchronous event. Here 2- way means, remote calls will handled and provides code to the share point to get context token for call backing to share point.
ProcessOneWayEvent() handles after action happened  means after item added/updated/deleted. This is one way Asynchronous event. One way means will just call the web service without callback to share point.

How Remote Events Works?
  • User makes an action (Add new/ Update/delete)
  • Share point communicates to the ACS and asks the Access token for the current Logged-in user information
  • Share point communicated to the web service and what to do for the event in the back end system.
  • Web service will Communicates to the ACS for it's token to do operation in SharePoint back end. Back end System sends Success/Failure message to web service.
Click here to check all the events support remote handler.

following XML shows the elements.xml file that shows remote event receiver item adding. Here URL means the URL of web service contains code to handle the event. 


<?xml version="1.0" encoding="utf-8"?>
<Elements xmlns="http://schemas.microsoft.com/sharepoint/">
  <Receivers ListTemplateId="104">
      <Receiver>
        <Name>MyCustomRemoteEventReceiverItemAdding</Name>
        <Type>ItemAdding</Type>
        <SequenceNumber>10000</SequenceNumber>
        <Url>~remoteAppUrl/RemoteEventReceiver1.svc</Url>
      </Receiver>
  </Receivers>
</Elements>

App Event Receivers:

App event receivers can handles the events for an app in share point like App installing, App uninstalling, App deleting.This will be useful thing, you want to send an notification email to the users when an app got deleted. We can handle few app events through this model. we can't update a list item in HandleAppInstalled Event, because there is no list exists in the app web when first installed the app.  

We can handle following events,
  • Handle App Installed
  • Handle App Uninstalling
  • Handle App Upgraded
To handle the event we need to set the property value to True and False to disable the handler. A web service will be added to the web application, that contains the code file to run the handler. We have ProcessEvent(), ProcessOneWayEvent() methods that contains code. InstalledEventEndPoint tag contains web service code file url, in the AppManifest.xml file. To disable the handler we need to make the property value to False for the event in the properties window. 

Will update two more posts regarding how to create remote event handlers and App event handlers.