
Monday, April 29, 2013

"The Content has expired and can no longer be used" error in share point 2013

While accessing a SharePoint site, I got an error “The Content has expired and can no longer be used” as shown below.

I have check the error in log files, it has been logged as,

System.Runtime.InteropServices.COMException: The context has expired and can no longer be used. (Exception from HRESULT: 0×80090317), StackTrace:
 at Microsoft.SharePoint.SPGlobal.CreateSPRequestAndSetIdentity(SPSite site, String name, Boolean bNotGlobalAdminCode, String strUrl, Boolean bNotAddToContext, Byte[] UserToken, SPAppPrincipalToken appPrincipalToken, String userName, Boolean bIgnoreTokenTimeout, Boolean bAsAnonymous)
 at Microsoft.SharePoint.SPSite.get_Request()

The basic cause for this error, the clock settings for SharePoint is not sync with the clock settings for server. To fix this go to Central Administration -> Application Management -> select Web application -> on the ribbon General settings tab -> select General settings -> update the time zone with the share point server as shown below.


Disable/ Increase the “Web page Security validation” in general settings for SharePoint web application. Central Administration -> Application Management -> Manage Web Application -> Select Web application -> on the ribbon select “General settings” -> Off the Security validation/Increase security validation expire time as shown below. Disabling the "Web Page Security Validation" will not be preferred option. 


Wednesday, April 24, 2013

"there are no addresses available for this application" error in SharePoint managed metadata service

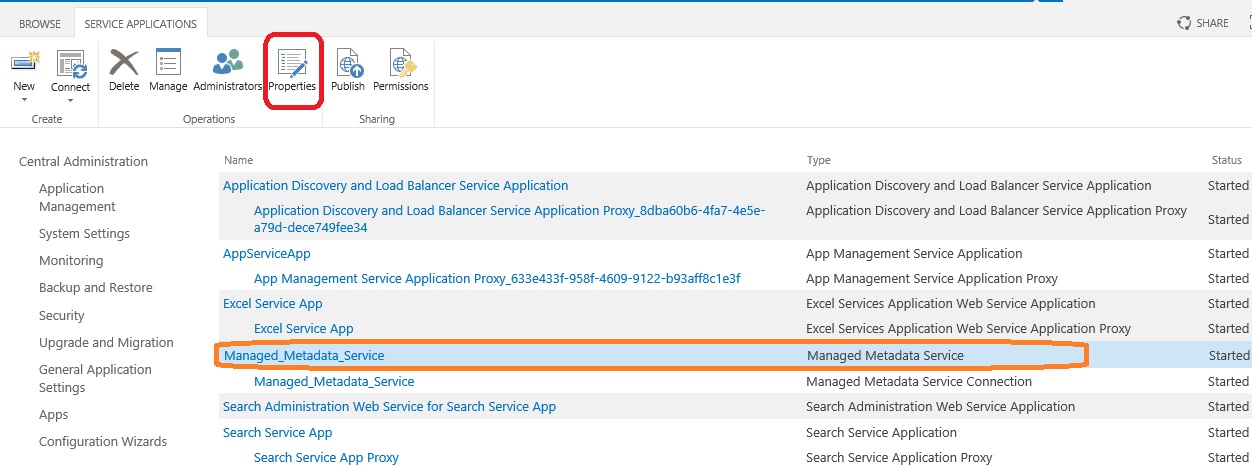
In SharePoint 2013, After Configuring the managed metadata service app in SharePoint 2013, when click on “Properties” on the top ribbon for managed metadata service app, it is showing a popup box with the message “there are no addresses available for this application” as shown below.


For Managed metadata service app properties, it is showing the error message “The managed Metadata Service or Connection is currently not available. The Application Pool or Managed Metadata Web Service may not have been started. Please Contact your Administrator”.


In the error message itself SharePoint providing the solution. I was checked the Managed Metadata service (Central Administration -> manage Services on server -> Managed metadata service). It was stopped. Started the service.


Check the application pools in IISManager, started the Application pools in IISManager.


If still getting the same issue, just do IISRESET.  
Finally managed metadata service is working like charm.


Monday, April 22, 2013

Sharepoint 2013- app prompting for credentials

I have developed an app in app in office 365 site and every thing went well for app in office 365 site. I have developed same app for share point 2013, using visual studio office development tools. Before deploying app in share point server, we need to check the following list of things in share point server,

  • Create an App Domain-- Done
  • Run Shared Service Instances-- Done
  • Check App Service and SharePoint Subscription services are running in the server-- Done
  • Create Subscription Settings Service Application, Subscription Settings Service Application Proxy through Power shell-- Done
  • Create App Management Service, App Management Service Proxy-- Done
  • Add App prefix-- Done
  • Add App Domain to the List of Intranet Sites in Internet Options-- Done 

Deployed the app in share point site, while accessing the app through share point site, it is prompting for credentials. I have tried many times with different credentials, Redeployed app to share point site and restarted my machine, No luck.. :(

I have googled for the same issue and in Microsoft forums i got some clue on the issue. The issue here is we need set the value for DisableLoopbackCheck registry key.

What is Loop Back Check
From Server 2003 SP1, There is feature called Loop back check related to security. It will makes server can't call by itself through the host name, that share point does. So that share point will prompts us to enter credentials.

i have followed following steps to fix this error,

Go to Registry Editor (Run-->regedit)


Navigate to HKEY_LOCAL_MACHINE\SYSTEM\CurrentControlSet\Control\Lsa


Right-click Lsa--> New--> DWORD Value.


Type DisableLoopbackCheck, and then press ENTER.


Right click on DisableLoopbackCheck--> Modify,


Change value form 0 to 1 and click on OK.


Quit Registry editor and restart computer.

That's it. My issue got fixed and i am able to see my custom app. Hope this help you.

Wednesday, April 17, 2013

SharePoint 2013- Content type publishing using content type hub

In my previous posts i have explained about configuring managed meta data, Creating terms and term sets, Associating managed meta data to a share point column. 

SharePoint supports accessing content types from one site collection to another site collection through content type hub. To create content type hub, we need to configure managed meta data service in service applications. 

Check properties for Managed metadata service in central Administration (Central Administration--> Application Management--> Manage Service Applications--> Managed meta data service--> Properties)


Check Content Type hub site url, if Content type hub url is empty, Add new site collection url that to work as content type hub. If content type hub url already configured, check "Content Type Syndication Hub" feature activated or not in the site collection features.
(Site Settings--> Site Collection features--> Content type syndication Hub). Content Type Syndication Hub feature must be activated to publish the content type.


Check Managed meta data service connection properties, Check "Consumes content types from the Content Type Gallery at ......" as shown in the image below.


Go to Content type hub site collection, Create new content type to publish (Site Settings--> Site Content types--> Create). In my case i have created a content type "Test", Added few existing columns to that content type. Click on "Manage publishing for this content type" link, select "Publish" and click "OK".


To check/use content type in another site collection, we need to run two timer jobs(Content Type Hub, Content Type Subscriber) in central admin(Central Administration--> Monitoring--> Review timer jobs).


Check Content Type Hub timer job, Content Type Subscriber timer job associated with content type hub site collection.


Click on the timer job inks and click on "Run now" button.(Here we are running timer jobs to see the published content type immediately in another site collection)


Go to any other site collection to use published content type, check site content types(Site settings--> Site Content Types). You can able to see the published content type in the site content types.


You can see only "Advanced settings" link for the content type as shown below.


If you need any change in the content type means to add/delete/update any column(s) in the content type, go to content type hub site collection, change the content type, republish the content type and run the timer jobs.

provide you comments and suggestion on this post. 

Monday, April 15, 2013

SharePoint 2013- Create term set, terms, Assign managed metadata to a list/library column

In my previous posts i have explained basics of managed meta data and configuring managed meta data in share point.

In post i am writing about how to use (assign) managed meta data to a list/library column  After configuring managed meta data service, click on managed meta data service in the service applications.
(Central Administration--> Manage service Applications--> Managed meta data service (Configured earlier))

You will be redirected to term store management tool page. Add new group to managed meta data group as shown in the image below. 

I have added group  named as school as shown below.


We can see the General properties for the term set as shown in the above image.
Add a term set to the school group. I have added students as term set. 


For term set we can see four menu options on the to. as shown in the images.
General- General options for term set like name, Description, Owner, Contact, Owner, Unique ID.

Intended use- usage of the term set.


Custom sort- sorting option


Custom properties- option to add custom properties to the term set.

Add term to the term set. I have added class-1, class-2, class-3, class-4...etc as shown image below.

for term also, we have two menu options, General and custom properties.


Add new column to the list\library of type managed metadata. Added new column to the Document library with "Student class" and select the type as shown in the below.


Add new document to the document library. For the column Student class managed meta data will suggest the option as shown in the image below.

As that we can configure managed meta data column. Provide your comments and suggestions on this post.